A Smaller, Faster, and More Efficient Home Server
A few years ago I built a home NAS and virtualization server. While I moved past SmartOS after a year or two to FreeNAS, the hard drives are aging and I realized it isn't very efficient compared to what's available now. From my prior post, the hard drives were replaced with 6 4TB drives in a ZRAID-2. This ended up giving me vastly more space than I had any need for and as I now have a 1Gbps fiber line I don't feel the need to store 16 TB locally.
Given my Internet connectivity and increased focus in my spare time on containerized applications using Kubernetes, I figured it might be a good time to 'downsize' in power consumption while increasing my virtualization capabilities. The new server configuration I ended up with is a fraction of the size (half-length 1U vs full-length 2U) and power (190w idle vs 40w idle), while having 4x the cores and over 8x the memory capacity. 7 years has definitely helped on what you get for the same price!
System Specs
It took awhile before Epyc embedded processors and vendors 1U systems started to hit the market, but the 8-core/16-thread Epyc 3251 in a nice half-length 1U is now widely available. Serve The Home did a great review of this system which helped convince me to purchase one.
Here are specs for this build:
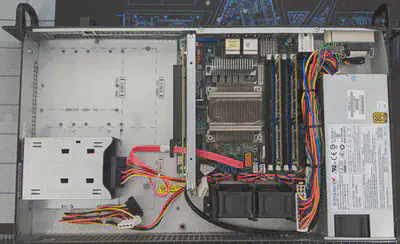
- CPU/Motherboard: AMD Epyc Embedded 3251 (8-core / 16-thread) on Supermicro M11SDV-8C-LN4F
- Case: Supermicro AS 5019D-FTN4
- RAM: Supermicro DDR4-2666 64 GB ECC LRDIMM x2 (128 GB total)
- NVMe Drive: Samsung 970 Evo Plus 1TB
- SATA Drive: Sandisk Ultra 3D 2TB
Overall cost: ~$2100
This is a bit more than the last buuild, but is 100% SSD storage without any redundancy. I'm relying on cloud backups and accepting that I will have some downtime if a part fails. I consider this an acceptable trade-off to keep costs lower with the hope that once a SSD has proven itself for a few months it should last much longer than a spinning platter drive as I don't anticipate heavy read/write loads that would wear out the drives.
If I really go nuts with VM's and containers I still have 2 DIMM slots free for another 128 GB of memory. I've found that for personal use containers usually run into RAM pressure much earlier than CPU pressure.
OS Choice
I've been reading a lot of Serve the Home, and their glowing review of Proxmox VE convinced me to give it a try. I've been enjoying it so far and it's easy to get started with and makes running KVM a breeze.
ProxMox VE it is!
I grabbed the ISO for installing ProxMox 6.0, based on a buster debian distro. Using the ISO directly from my computer was rather easy from the Supermicro IPMI Java interface. While the ikvm HTML5 interface is more convenient, the Java-based console makes it a breeze to attach local .iso files as a CD/DVD drive to the server.
I'm running the community edition, which requires you to edit the
/etc/apt/sources.list to include the non-enterprise
deb:
deb http://download.proxmox.com/debian/pve buster pve-no-subscription
Additional steps:
-
From the shell in the web UI:
apt-get update apt-get dist-upgrade -y reboot -
Add the additional drive as a new lvm-thin pool
AWS Storage Apppliance
The first thing I wanted to try was utilizing hybrid storage in AWS with their Storage Appliance. Unfortunately AWS only provides a VMWare image. I found a few articles online that indicated this was rather easy to convert to a raw disk image for use in Proxmox, and got it working rather quickly.
-
Download the AWS Storage Gateway zipfile
-
Unzip the zipfile (resulting in an
.ovafile) -
tar xf AWS-Appliance-2019-07-24-1563990364.ova(Filename dependent on time it was d/l) -
qemu-img info AWS-Appliance-2019-07-24-1563990364-disk1.vmdkand record the virtual size to use when provisioning a proxmox KVM -
Provision a Proxmox VM with the given size disk, using an IDE disk emulation target. I gave my VM 16GB of memory, as I wasn't sure how much it would want.
-
Determine the location of the LVM disk used by the new VM (something like
/dev/pve/vm-100-disk-0). -
Convert the vmware disk image to the raw:
qemu-img convert -f vmdk -O raw AWS-Appliance-2019-07-24-1563990364-disk1.vmdk /dev/pve/vm-100-disk-0 -
Edit the VM hardware to add the LVM-thin drive resource. I added a 150Gb hard drive as another IDE resource per AWS recommendations for local cache size.
-
Start the VM.
-
Look at the console in proxmox to determine the IP, and change it as desired for a static IP.
-
Finish setup in the AWS Console for the Storage Gateway, your computer will need to be able to talk directly to the VM running the appliance VM. You will be asked to set a cache drive, select the additiona 150Gb drive.
Pros
- Fast access to frequently accessed files that fit within the cache
- Everything backed by S3 reliability
- As much storage as you want to pay for
- It's fun to see that your SMB share has 7.99 Exabytes free
Cons
- Unavailable when the Internet is out
- Slower access than a NAS
- SMB requires an Active Directory server for user based permissions or a single guest account with read/write access to all SMB shares.
- NFS shares have similarly odd restrictions
RancherOS
I followed these
directions
to install RancherOS under ProxMox VE. Reproduced here with a fix to the
cloud-config.yml as the example didn't validate.
- Download RancherOS ISO
- Upload the iso to (local)pve
- Setup a VM with RancherOS ISO as CD. Give it at least 3gb ram to start. Rancher Server failed with low ram
- Boot
- From Console change password
- sudo bash
- passwd rancher
- SSH to rancher@
- prepare your ssh keys with putty gen or local ssh key-gen
- vi cloud-config.yml
- paste the cloud config edited with your settings, make sure the pasted data is pated correctly, add your key in a single line
- press exit exit :wq to save
#cloud-config

    rancher:
      network:
        interfaces:
          eth0:
            address: 10.68.69.92/24
            gateway: 10.68.69.1
            mtu: 1500
            dhcp: false
        dns:
          nameservers:
          - 1.1.1.1
          - 8.8.4.4

    ssh_authorized_keys:
      - ssh-rsa <YOUR KEY>
sudo ros config validate -i cloud-config.ymlsudo ros install -c cloud-config.yml -d /dev/sda
- Remove CD Image from VM, and then reboot.
- SSH back into RancherOS (rancher@) using your new ssh private key
Rancher
With RancherOS running happilly, its time to install Rancher on the VM. This is relatively easy, from the RancherOS VM shell, just run:
sudo docker run -d --restart=unless-stopped -p 8080:80 -p 8443:443 -v rancher:/var/lib/rancher rancher/rancher:stable
Mapping port 80/443 to different local ports is to avoid intereference from the ingress proxy which will be running on this same node.
Once Rancher is available on port 8443:
- Add a cluster, of custom type.
- Name it, and hit next.
- Select all three node options (etcd, Control Plane, Worker)
- Copy the command shown and run it in the RancherOS shell.
- Click Done in the Rancher UX.
- The cluster will become available.
Setup the SATA SSD
I want to use the SATA SSD for persistent volumes for the containers:
-
Add a hard drive in Proxmox VE to RancherOS VM
-
Choose a sufficient size (I choose 400 GB)
-
Start the RancherOS VM (or restart it)
-
Verify additional hard drive appears in
fdisk -l -
Format the hard drive with
fdisk /dev/sdb -
Choose new partition, primary, select default start/end values
-
Format the partition with
mkfs.ext4 /dev/sdb -
Set it to load at start in RancherOS:
ros config set mounts '[["/dev/sdb","/mnt/data","ext4",""]]' -
Reboot and verify
/mnt/datais a volume mount.
Fin
That's it for a first day of configuring things. Next up I'll need to setup MetalLB so that my Kubernetes containers I start with Rancher get LAN IP's rather than shuttling everything through the default nginx ingress.